
 As a house painter, when presented with a wall freshly layered in plaster, it is the perfect backdrop for a new splash of color. However, painting over such a surface within the interiors of Pleasanton, CA, homes is more complex than one might initially think.
Indeed, it’s feasible to apply paint over a wall that’s just been plastered, but it’s imperative to weigh several considerations first. Painting these newly plastered surfaces is integral to the interior finishing process. Plastering itself, which involves the application of a smooth plaster compound across walls or ceilings, aims to establish an even base. Once this plaster base has adequately dried and set, applying paint not only serves to safeguard this layer but also significantly boosts the visual appeal and contributes to the room’s aesthetic value. Yet, the key to achieving a visually stunning and enduring finish is thorough preparation and the judicious selection of compatible paint.
Engaging in painting plastered walls, whether part of a brand-new build or a renovation effort, is vital for delivering a finish that stands the test of time, both in terms of durability and style. Mastery of the correct timing and methodologies for painting over plaster is crucial for several reasons:
- Ensuring solid paint adhesion to the plaster surface
- Preparing the surface meticulously
- Maintaining a minimal moisture level in the plaster
- Applying an appropriate primer
- Selecting the most fitting paint for the job
- Utilizing effective painting techniques
Navigating these aspects successfully guarantees the longevity of your paint job. It enhances the overall ambiance of the space, making it a crucial phase in completing any interior project.
Why Plaster Is Used on Walls
Plaster serves both protective and decorative purposes for walls and ceilings, and it’s also utilized to create ornamental details. This versatile material is produced by heating substances like gypsum, limestone, or various minerals to eliminate water content, resulting in a powder. Once water is added back, the powder becomes a pliable mix that can be shaped and modeled. As it dries, plaster hardens into a firm, enduring surface.
Various plaster types are employed for different wall applications, each distinguished by unique characteristics and uses:
- Gypsum Plaster: Predominantly composed of gypsum, this type of plaster is a go-to for interior surfaces due to its smooth texture and quick-setting properties, without the need for lime. Its resistance to fire adds to its appeal in contemporary building practices.
- Lime Plaster: A traditional blend of lime, water, and sand, lime plaster boasts historic use thanks to its flexibility, permeability, and antiseptic qualities, making it perfect for restoration projects and eco-conscious constructions. It takes more time to cure than gypsum-based plasters.
- Cement Plaster: This robust mixture, combining Portland cement, sand, and water, is favored for exterior facades and moisture-prone areas such as bathrooms and kitchens, attributed to its moisture resistance and durability. Its structural strength allows for application over various surfaces, including brick, stone, and concrete.
- Venetian Plaster: For a touch of elegance mimicking marble or stone, Venetian plaster blends lime with marble dust, applied in several polished layers for a glossy finish. It’s chosen for its luxurious decorative effects on walls and ceilings, offering a rich texture and color depth.
- Clay Plaster: Made from a mixture of clay, sand, and natural fibers, clay plaster is celebrated for its environmental benefits and excellent moisture management. Ideal for eco-friendly construction, it promotes better indoor air quality by allowing walls to “breathe.”
Each plaster type brings its advantages, catering to different aesthetic and functional requirements in building and design projects.
Drying and curing new plaster is essential for creating a robust and enduring surface ready for painting or the application of wallpaper. This critical phase encompasses the physical removal of water through evaporation and the chemical transformations that solidify the plaster. Below is an in-depth examination of this process:
1. Initial Drying Stage
- Setting Phase: Once the plaster is applied to walls or ceilings, the initial hardening process begins, though the mixture remains notably moist. The duration for the plaster to reach this initial set varies based on the plaster variant, application thickness, and the prevailing climate.
- Moisture Evaporation: During this stage, water within the plaster mix evaporates, leaving the solid components behind. Ensuring good airflow facilitates this water escape, thus expediting drying. Yet, excessive air movement might hasten drying excessively, causing the plaster to crack.
- Climate Impact: Ambient temperature and humidity significantly influence the drying pace. Optimal drying occurs under conditions of warmth and moderate humidity. Conversely, cooler or highly humid settings delay drying, whereas overly hot and arid conditions may lead to premature drying and cracking.
2. Curing Stage
- Chemical Solidification: Following the initial drying, plaster enters the curing phase, marked by a series of chemical reactions (notably hydration) that further solidify the material, enhancing its strength and resilience.
- Duration: This phase extends well beyond the drying stage, potentially spanning several weeks until completion. The specific time frame depends on the plaster type and the surrounding environmental conditions.
- Curing’s Critical Role: The plaster must achieve thorough curing to reach optimal strength and durability. Rushing into painting or wallpaper application can entrap moisture within the plaster, potentially causing mold development, paint or wallpaper peeling, and bubbling.
Understanding and respecting these stages ensures that newly plastered surfaces are adequately prepared for finishing touches, ultimately enhancing the longevity and aesthetic appeal of the final surface treatment.
Environmental elements like humidity and temperature profoundly influence the rate at which plaster dries. Below is an outline of their impact:
Humidity Impact: Elevated humidity levels impede the plaster’s drying process because the moisture-laden air is less efficient at drawing water out of the plaster. In scenarios where the air is heavy with moisture, water evaporation from the plaster is decelerated, prolonging the drying period. Conversely, environments with low humidity enable the air to pull moisture from the plaster more effectively, thus accelerating the drying process.
Temperature Influence: Temperature is another decisive factor in determining how quickly plaster dries. Increased temperatures can hasten the drying process by boosting the rate of water evaporation from the plaster. Since warmer air has a higher moisture capacity than cooler air, plaster tends to dry more swiftly in warm settings. Conversely, lower temperatures can diminish the evaporation rate, extending the plaster’s drying time. However, excessively high temperatures might lead to too rapid drying, which can result in cracking and compromise the plaster’s integrity.
Can You Paint Too Soon?
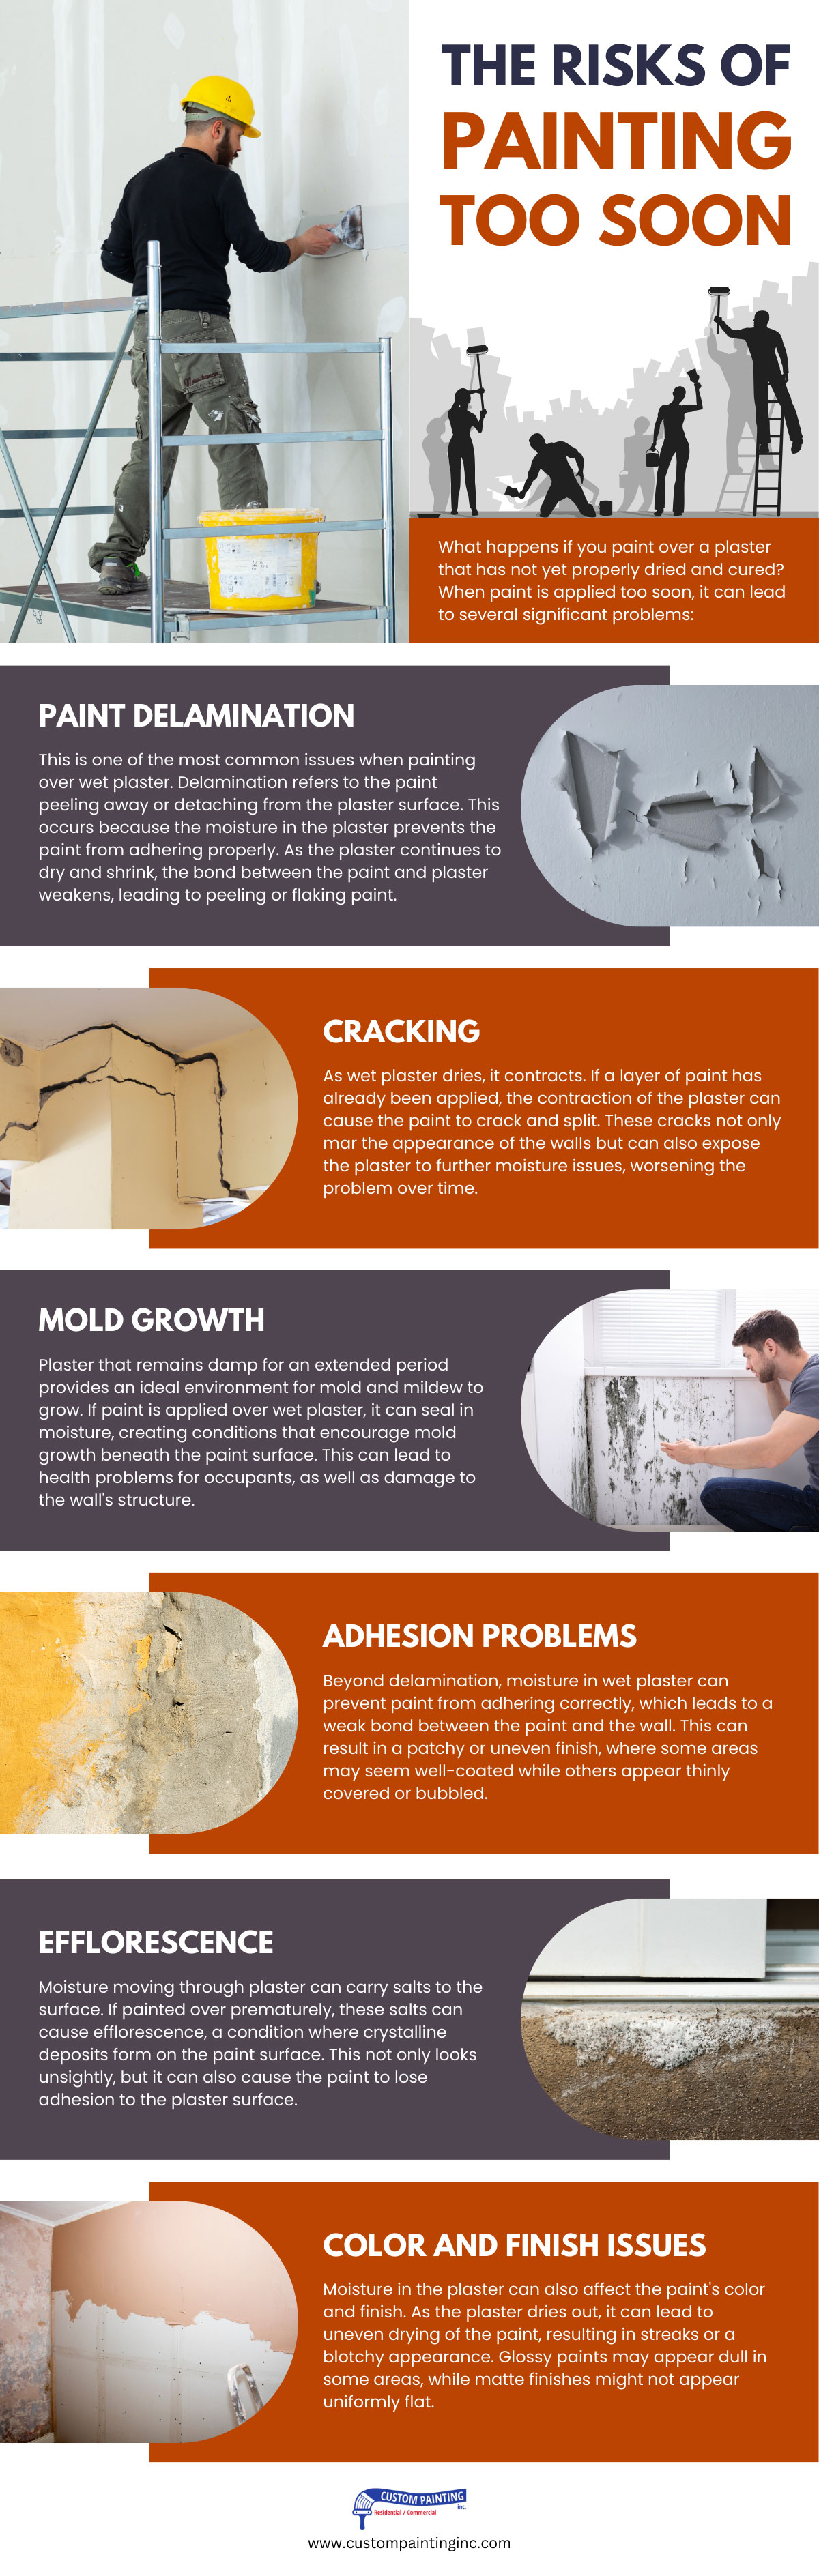
Applying paint over plaster that hasn’t thoroughly dried and cured can result in multiple adverse outcomes:
- Delamination of Paint: A prevalent complication when painting over moist plaster, delamination describes where paint starts to peel or separate from the plaster. This issue arises as the moisture present in the plaster hampers the paint’s ability to form a solid bond. As the plaster continues to lose moisture and shrink, the connection between the paint and the plaster diminishes, causing the paint to flake or peel off.
- Cracking: The natural drying process of plaster involves contraction, which can be problematic if paint has been prematurely applied. This contraction can lead to the paint cracking or splitting, damaging the wall’s visual appeal and potentially leading to more severe moisture problems by exposing the underlying plaster.
- Mold Development: Damp plaster can create a conducive environment for mold and mildew. Painting over such plaster traps moisture, fostering an environment where mold can thrive beneath the paint layer, posing health risks to residents and compromising the wall’s structural integrity. Visible as discoloration, mold significantly impacts indoor air quality.
- Issues with Adhesion: Apart from delamination, moisture in plaster can interfere with the paint’s adhesion, resulting in a bond that’s not as strong as it should be. This weak adhesion can manifest as an uneven or patchy finish, with some areas looking adequately painted and others not.
- Efflorescence Formation: When moisture migrates through plaster, it can transport salts to the surface. Painting before the plaster is fully dry can lead to efflorescence, where salt deposits crystallize on the paint’s surface, detracting from the aesthetic and weakening the paint’s grip on the plaster.
- Compromised Color and Finish: The residual moisture in plaster can alter the paint’s color and finish, causing uneven drying that results in streaking or a blotchy look. This issue can affect the uniformity of both glossy and matte finishes.
Ensuring plaster is completely dry and fully cured before painting is essential to circumvent these issues. This often means allowing a waiting period that can extend from several days to weeks, contingent on the plaster’s thickness, the ambient conditions, and the environment’s humidity level.
Imperfections in paintwork can significantly mar a surface’s visual appeal and perceived quality. Below are some prevalent issues related to paint finishes and color, along with their typical causes:
Issues with Paint Finish:
- Brush and Roller Marks: Apparent strokes from brushes or rollers can undermine the professionalism of a finish. Such marks usually stem from using subpar painting tools, incorrect paint volume application, or neglecting to keep a continuous wet edge.
- Drips and Sagging: Excess paint leading to drips or a sagging effect disrupts the uniformity of the surface. Often, this results from overloading the brush or roller, mainly when working on vertical areas, without employing the proper techniques.
- “Orange Peel” Effect: Named for its resemblance to the texture of an orange peel, this slightly rough surface texture is a common occurrence in spray painting. It can be caused by applying too heavily, overly thick paint, or spraying from too far away.
- Overlap Marks: Visible when the edges of freshly applied paint overlap with areas that have started to dry, creating a mismatch in texture and appearance. This happens when there’s a failure to blend wet paint seamlessly with adjoining sections.
Color Variations:
- Color Discrepancies: Minor differences in shade or color can stand out, detracting from a surface’s uniform look. Mixing different batches of paint or insufficiently stirring the paint before use can lead to this issue.
- Fading and Chalking: Paint may lose its vibrancy or develop a powdery residue over time due to exposure to sunlight and the elements, resulting in an uneven appearance. The rate at which this happens can depend on the paint’s formula and pigment quality.
- Stain Bleeding: When previous colors or stains seep through the new layer of paint, causing uneven shades. Typically, this indicates that the surface needed to be adequately prepared or that a primer was needed but not used.
- Patchy Appearance: Paint absorbing unevenly, especially on porous materials, can create a blotchy look. Thorough surface preparation and priming can prevent this problem.
Addressing these issues involves careful preparation, choosing the suitable materials for the job, and applying paint with the correct techniques, ensuring a smooth, even, and aesthetically pleasing finish.
Preparations for Painting
Follow this detailed guide to ensure your plaster is thoroughly dry and primed for painting:
1. Allocating Adequate Drying Time:
- Fresh Plaster: Generally needs at least four weeks to fully dry, though this timeframe can fluctuate with variations in humidity and temperature.
- Repair Patches: Smaller plaster repairs might dry quicker, usually ranging from a few days to a week, influenced by the repair size and existing environmental conditions.
2. Observing Color Changes:
As the plaster dries, its color shifts from dark to light. An even, lighter hue across the entire surface often signifies sufficient drying.
3. Detecting Moisture:
- The Touch Method: Lightly press your fingers against the plaster; it should not feel damp but match the ambient temperature. A cool or moist touch indicates further drying is needed.
- Using a Moisture Meter: Employ a plaster-specific moisture meter for accurate moisture content reading. Ideal moisture levels should align closely with those typical of dry indoor environments.
4. Evaluating Room Conditions:
The drying pace can be hampered by high humidity and cool temperatures. Employing a dehumidifier and modestly warming the room can aid in the drying process.
5. Promoting Ventilation:
Proper air circulation is crucial. Open windows or utilize fans to help moisture exit the space, being cautious not to direct air forcefully onto the plaster to prevent uneven drying.
6. Conducting a Visual Check for Flaws:
Before painting, scrutinize the plaster for any signs of cracks, damage, or surface irregularities. Correct these issues and ensure they are completely dry before proceeding.
7. Applying Primer:
With the plaster dry, proceed with a plaster-compatible primer to seal the surface, facilitating smoother paint application and uniform color distribution.
8. Performing a Patch Test:
If you doubt the plaster’s dryness, apply paint to a small section as a trial. After it dries, inspect for any moisture-related damage or issues with paint adherence.
By adhering to these steps, you can prepare your plaster walls effectively, creating an ideal canvas for painting and achieving professional-looking results.
Ventilation Is Important
Ensuring proper ventilation during the drying phase of plaster is paramount for the integrity, longevity, and health safety associated with plasterwork. Highlighted below are critical reasons underscoring the necessity of adequate airflow:
- Regulation of Moisture: For plaster to dry uniformly and slowly, thereby averting cracking, sufficient airflow is essential. It allows the surplus moisture to dissipate, mitigating the likelihood of structural frailties arising from rapid or patchy drying.
- Mitigation of Mold and Mildew: By facilitating moisture control, adequate ventilation is a deterrent against mold and mildew formation, which can compromise both the plaster’s condition and the health of those within the space.
- Augmentation of Strength and Durability: The overall robustness and endurance of plaster are significantly enhanced through proper drying. Inadequate ventilation might leave the plaster moist internally, precipitating long-term deterioration like disintegration or poor adhesion.
- Preservation of Air Quality: As plaster dries, it may emit VOCs and other chemical substances into the environment. A well-ventilated area ensures such emissions are diluted, safeguarding indoor air quality and reducing health hazards.
- Enhancement of Efficiency and Cost-effectiveness: Streamlining the drying process via good ventilation can expedite construction or renovation timelines, yielding financial savings and minimizing project delays.
To expedite the drying process safely and efficiently across different contexts, here are some adaptable strategies:
- Leverage Sunlight: Where feasible, allowing direct sunlight to aid drying can be adequate, with caution exercised for items sensitive to UV radiation.
- Employ Absorbent Materials: Towels, sponges, or specialized absorbents can effectively draw out moisture.
- Utilize Dehumidifiers: In enclosed spaces, dehumidifiers can play a pivotal role in lowering humidity levels, thus facilitating quicker drying.
- Deploy Fans: Circulating air across surfaces with fans can enhance evaporation rates, though care should be taken to avoid creating dust-adhering air currents.
- Opt for Thin Paint Layers: When painting, applying multiple thin coats rather than a single thick one can significantly reduce drying times.
- Adjust Temperature: Increasing the ambient temperature can accelerate the drying process by boosting the evaporation rate.
Primer Is Your Friend
Applying primer to fresh plaster walls plays a critical role for various reasons:
- It effectively seals the surface.
- Boosts the adhesion for subsequent paint layers.
- Ensures an even and consistent paint finish.
- Conceals any underlying stains.
- Amplifies the paint’s longevity and performance.
- Acts as a moisture-repellent layer.
Selecting an appropriate primer is crucial when preparing plaster walls for paint or wallpaper to achieve a long-lasting and aesthetically appealing result. Factors such as the current state of the wall, the paint type intended for use, and specific concerns like stains or smells need careful consideration.
Various primer options are well-suited for plaster walls, each offering distinct advantages:
- PVA (Polyvinyl Acetate) Primer: Tailored for plaster walls, this primer prevents excessive paint absorption, fostering a more even coat. It enhances paint adherence, minimizing the paint quantity needed and extending the finish’s lifespan.
- Oil-Based Primer: Ideal for sealing and safeguarding, especially on older, unpainted walls, oil-based primers excel in stain blocking and preventing underlayer bleed-through. They ensure robust surface bonding, laying a solid foundation for any paint type.
- Shellac-Based Primer: Known for unparalleled stain-blocking properties, shellac-based primers are perfect for walls previously subjected to smoke, water, or other stain-inducing conditions. They quick-dry to form a paint-ready hard surface and are also effective in odor sealing.
- Latex Primer: Water-based latex primers are more environmentally friendly, offering easy cleanup. They stick well to plaster and provide flexibility to prevent cracking, making them suitable for sealing porous areas and smoothing the base for paint.
- Acrylic Primer: Another water-based choice, acrylic primers deliver exceptional adhesion and durability. Compatible with new and pre-painted plaster walls, they support various paint types without yellowing over time and offer moisture resistance.
- Stain-Blocking Primer: Essential for walls marred by stains or discoloration, these primers stop stains from affecting the final paint layer, promoting a pristine finish. Available in oil-based or water-based formulas, they address specific stain types effectively.
Choosing the suitable primer is a foundational step in ensuring your plaster walls are prepped and ready for the final aesthetic touches, guaranteeing quality and durability in your painting project.
Priming plaster walls before painting is crucial for achieving a seamless and long-lasting finish. Follow this comprehensive guide to prime your walls effectively:
1. Wall Preparation:
- Wall Cleaning: Begin by eliminating dust, grime, or oily residues from the wall surfaces using a damp sponge or cloth, possibly with a gentle detergent. Allow the walls to dry thoroughly.
- Damage Repair: Address imperfections such as holes or cracks by filling them with plaster or an appropriate filling compound. After drying, sand these areas to a smooth finish.
- Surface Sanding: Gently sand the entire wall surface with fine-grit sandpaper to enhance primer bonding, vital for glossy or previously painted walls.
- Dust Removal: Post-sanding, wipe away all residual dust with a clean, moist cloth or a tack cloth to ensure a clean surface for priming.
2. Priming the Walls:
- Selecting the Correct Primer: Opt for a primer compatible with plaster walls. Consider using a plaster or primer-sealer to inhibit excessive paint absorption for freshly plastered walls that haven’t been painted before.
- Protecting Non-Primed Areas: Employ painter’s tape to safeguard areas like trim, windows, and doors from primer and paint.
- Edge Priming (“Cutting In” ): Start with a paintbrush to apply primer meticulously around the wall’s edges, corners, and any spots inaccessible to a roller, creating a 2 to 3-inch border.
- Roller Application for Broad Sections: Utilize a roller for the primary wall area, dipping it in the primer to coat evenly, then roll it across the wall in slightly overlapping paths from top to bottom, ensuring uniform coverage.
- Uniform Primer Application: Aim for consistent application across the wall, avoiding uneven primer distribution.
3. Post-Priming Inspection and Additional Coating:
- Coverage Examination: After the primer dries, assess the wall for any patchiness or areas where the plaster is visible through the primer.
- Second Coat Application: If the initial primer coat appears uneven or lacks coverage, apply a second coat, replicating the initial application steps.
Implementing these steps diligently prepares your plaster walls for painting, setting the foundation for a polished and enduring aesthetic.
Choose the Right Tools and Paints
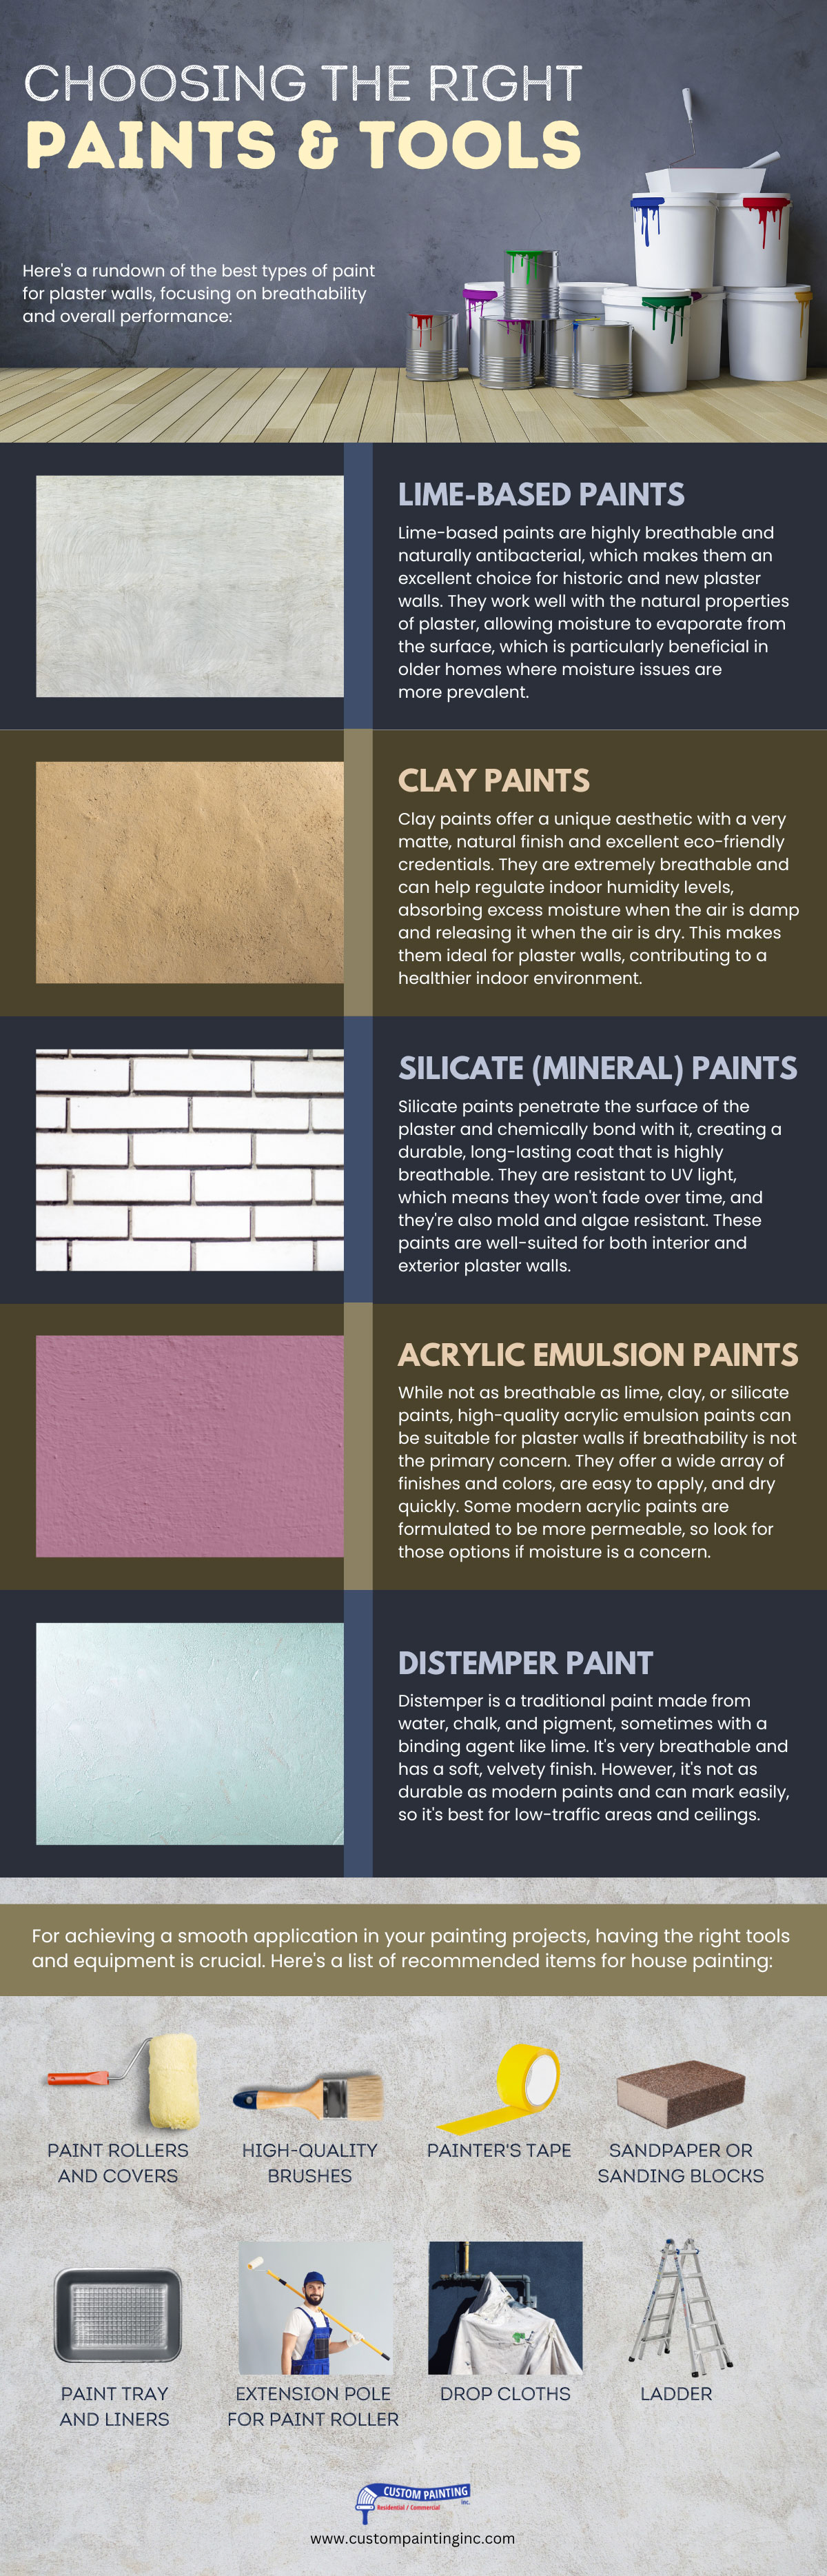
Exploring the optimal paint selections for plaster walls involves assessing their breathability and effectiveness:
- Lime-Based Paints: Renowned for their breathability and antibacterial qualities, lime-based paints are superb for aged and newly plastered walls. Their compatibility with plaster’s inherent properties facilitates moisture evaporation, a key advantage in older structures prone to dampness.
- Clay Paints: Known for their distinctive matte and natural appearance, clay paints are celebrated for their environmental benefits. Their exceptional breathability aids in maintaining balanced indoor humidity, absorbing or releasing moisture as needed, and promoting a healthier living space.
- Silicate (Mineral) Paints: These paints form a chemical bond with plaster, offering a resilient finish that breathes well. Their UV resistance ensures color longevity while also being resistant to mold and algae, making them ideal for indoor and outdoor applications.
- Acrylic Emulsion Paints: Although slightly less breathable than other options, high-grade acrylic emulsion paints are versatile for plaster walls, especially when breathability is less of a concern. They come in an extensive color range, are straightforward to apply, and are quick to dry. Opt for permeable variants to address moisture-related issues.
- Distemper Paint: A traditional option, distemper combines water, chalk, and pigment, occasionally with lime, to create a breathable, velvety finish. Given its less durable nature, it’s best suited for areas with minimal wear or ceilings.
Possessing the correct tools and supplies is vital for a flawless paint job. Essential items for house painting include:
- Rollers and Roller Covers: Essential for even and efficient coverage.
- Top-Quality Brushes: Key for detail work and precision edges.
- Painter’s Tape: For clean lines and protecting surfaces.
- Sanding Supplies: To smooth surfaces before painting.
- Paint Pans and Liners: For easy paint application and cleanup.
- Extension Poles: To extend the reach and ensure even coverage.
- Drop Cloths: To protect floors and furniture.
- Ladders: For accessing high areas safely.
Guide to Painting New Plastered Walls
Once the plaster is fully dry and you’ve applied primer to your walls, it’s time to bring them to life with paint. Follow this guide for a seamless painting experience:
1. Applying the Paint:
- Selecting Your Paint: Opt for a water-based emulsion paint for the finishing layers. Depending on your preference for thickness and color richness, you might need to apply two or more layers.
- Painting Method: Use a roller for broad strokes across the wall to paint in one consistent direction. Switch to a brush for finer details around edges and corners. It’s crucial to let each layer dry thoroughly before moving on to the next, with the drying duration dependent on the paint’s formulation and the room’s climate.
2. Adding Final Touches:
After the last layer has dried, inspect the wall closely for any areas that may have been overlooked or need additional coverage. Utilize a smaller brush for precision touch-ups as needed.
Extra Recommendations:
- Ventilation: Keeping the area well-ventilated is vital for speeding up the drying process and minimizing the inhalation of paint odors.
- Lighting: Adequate lighting is crucial for identifying missed spots or uneven paint application.
By adhering to these guidelines, you’re on your way to achieving a professionally painted look on your freshly plastered walls. Patience and attention to detail at every stage will yield the best finish.
Maintenance and Aftercare
Proper maintenance of freshly painted plaster walls is essential to preserve both their aesthetic appeal and the durability of the paintwork. Below are several guidelines to help you care for your newly painted surfaces effectively:
- Observing Adequate Drying Time: New paint on plaster requires sufficient time to cure fully. Generally, curing can take 2 to 4 weeks, varying with the paint variety and climatic conditions. Refrain from touching or cleaning the walls during this phase to avoid harm.
- Managing Humidity Levels: Elevated humidity can disrupt the paint’s drying and curing stages. Ensuring the space is well-ventilated and kept at a stable temperature aids in optimal paint curing.
- Soft Cleaning Approach: Gentle cleaning is advised after the paint has cured. A soft, slightly moist cloth can clean the surfaces, removing any strong chemicals or rough cleaning tools that might damage the paint.
- Prompt Spill Management: Tackle any spills on the walls immediately to avoid permanent stains. Dab spills carefully with a damp cloth, avoiding rubbing actions that might spread the spill or impair the paint.
- Conducting Touch-Ups: Address minor damages like chips or scratches with leftover paint, applying it with a fine brush for accuracy, ensuring it blends well with the rest of the wall.
- Safeguarding from External Factors: Maintain a safe distance between the walls and furniture to prevent abrasions. For walls exposed to sunlight, consider window treatments to minimize UV damage and paint fading.
- Choosing Compatible Paint for Future Applications: Should you decide to repaint, opt for a paint compatible with the initial application. Proper wall preparation before repainting guarantees superior results.
- Routine Dusting: Regularly dust the walls to prevent the accumulation of debris that could adhere over time. Employ a soft duster or cloth for this purpose.
Adhering to these care tips will help ensure your painted plaster walls’ longevity and pristine condition. Always consult the specific care instructions the paint manufacturer provides, as different paints may require unique maintenance approaches.
When painting plaster walls, be vigilant for several potential issues in the initial months that could compromise the paint job:
- Drying and Curing Considerations: Ensure the plaster is entirely dry before painting, which might extend over several weeks, depending on environmental factors. Painting over moist plaster may result in discoloration or peeling.
- Efflorescence Awareness: Watch for white, powdery residue (efflorescence) caused by salt deposits as plaster dries. Addressing this before painting is crucial to prevent paint flaking.
- Addressing Cracks and Shrinkage: Fill and sand any cracks due to plaster shrinkage for a smooth surface before painting.
- Improving Paint Adhesion: Paint might struggle to adhere to slick, unprimed plaster. A suitable primer can enhance adhesion, leading to a more enduring finish.
- Mitigating Moisture Damage: To prevent issues like bubbling or peeling, confirm the plaster is dry and the area well-ventilated, especially in high humidity.
- Uniform Absorption: Apply a mist coat to balance absorption differences and ensure an even finish.
- Mold and Mildew Prevention: In moisture-prone areas, consider mold-resistant paints or additives to thwart mold growth.
- Achieving Color Consistency: Additional paint coats or a high-quality primer may be necessary to counteract color inconsistencies due to drying variations or texture differences.
Thorough preparation and regular inspection following painting can preempt and address these concerns, ensuring a flawless and lasting finish on your plaster walls.

When to Call Professionals
Engaging a skilled painting professional to adorn your freshly plastered walls can significantly enhance the outcome and circumvent potential complications. Certain situations particularly benefit from the expertise of a professional painter:
- Achieving a premium-quality finish
- Navigating intricate wall textures or designs
- Guaranteeing swift and efficient project completion
- Leveraging extensive material knowledge
- Addressing issues on challenging walls, such as uneven plaster application
- Ensuring safety protocols are followed
- Providing warranties and insurance for peace of mind
- Minimizing stress throughout the project
- Delivering value through quality workmanship
The advantages of employing a seasoned painter typically surpass the expense, offering a hassle-free experience with superior results.
Selecting a trustworthy painting contractor is crucial for obtaining top-notch service and ensuring your investment pays off. Here’s a guide to navigating the selection process:
Conduct Thorough Research:
- Seek referrals from your social circle or community members who have had positive experiences with painting professionals.
- Explore online for reviews and feedback on platforms such as Yelp, Google, Angie’s List, or the Better Business Bureau, assessing the contractor’s reputation and customer satisfaction.
Confirm Professional Credentials:
- Verify the painter’s licensing for your region and ensure they have adequate liability and worker’s compensation insurance to cover unforeseen incidents.
- Membership in professional bodies like the Painting Contractors Association (PCA) often indicates a commitment to quality and reliability.
Evaluate Experience and Portfolio:
Opt for a painter with a robust portfolio and years of experience. Request to see examples of past projects or visit sites of recent work to gauge their expertise.
Gather Multiple Quotes:
While comparing quotes from at least three contractors is wise, the decision should not solely hinge on cost. Quality and value should drive your choice.
Inquire Effectively:
Discuss their work process, material preferences, the scope of paint layers, property protection measures, and cleanup plans. Ask about the project timeline and crew size as well.
Reference Checks:
A credible contractor will readily provide references. Contact these past clients to inquire about their experience regarding work quality, punctuality, and professionalism.
Carefully Review the Contract:
Ensure the contract comprehensively outlines the project scope, material details, timelines, and payment terms. Clarify how any changes or unforeseen circumstances will be addressed.
Understand Warranty and Service Follow-up:
Discuss the warranty on the work to understand what is covered. Trustworthy contractors stand by their work and offer assurances against defects.
Effective Communication:
The contractor should communicate clearly and make you feel at ease with the project’s progression.
Trust Your Gut:
If you have reservations about a contractor, it may be wise to continue your search.
By selecting a painting professionally using these guidelines, you can ensure a successful and satisfying painting project for your freshly plastered walls.
Conclusion
Applying paint to new plaster is entirely achievable, though it diverges from the process used for standard drywall, necessitating specific considerations. Painting over plaster demands patience and meticulous attention to detail to avoid an unsatisfactory outcome.
Painting walls with newly applied plaster is more nuanced and demands extra diligence. Hastily moving through the painting stages can introduce various complications, potentially necessitating a redo of the work.
To ensure a flawless application on your first attempt with newly plastered walls, enlisting the expertise of a professional painting service in Pleasanton, CA, is advisable. For professional assistance, contact Custom Painting, Inc. at 925-294-8062 or through our contact form today.